Friday, December 16, 2016

New Mold.....Old Project

I got a new bowl mold that is deeper than any I have used in the past. I had this full fused flat piece for a while but hadn't decided what to do with it. It fit this mold perfectly. So a slumping I did go. The mold has a 1 inch flange round the top and my piece was about 1/2 inch inside that flange. It just so happened when it slumped the top edge came just to the top edge of the vertical sides. So the flange did not come into play. I like the depth of the bowl and will probably use this mold a lot. I noticed on the outside the lavender opal glass slightly got a crinkled texture around the top 1 inch. I think that was caused by the larger edge shrinking into the smaller sides of the bowl.

Christmas Colors, But Not Just For Christmas

Just out of the kiln this a.m. Pretty colorful using complementary colors. I put the design elements on a single clear layer. I didn't get too much shrinkage . The border created a slightly wavy edge. Next time I might try letting some pieces touch or hang over the edge to make a more organic edge. All my work is fired in a Bonnie Glo Kiln which is all fiber. So far I just love it. Easy to use and faster cool down.

Thursday, December 15, 2016

Angel Ornaments

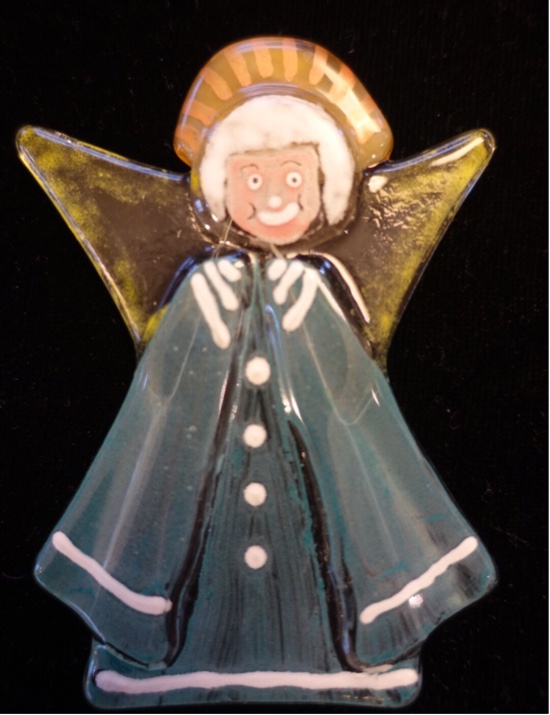
This is my first angel designed ornament. It is all clear glass except for the halo which is an opal glass. The rest of the angel is hand painted with Glass Line Paints using a damp brush for the large areas. For the smaller details I use the metal tips on the paint bottles. Next time I will simplify the face, especially the mouth, with a much finer line. I fired this using a soft contour schedule which retained a little of the overlapping form.


These are my second simplified Angels. They are made using 4 pieces of glass where the above angel is seven pieces. I use the triangle as the main shapes for the body and the wings. The wings are one triangle turned upside down and placed under the body piece. I cut the tip off the top of the body section where the head butts up to it. Then the head and halo are two more separate pieces. The body pieces on these are white opal glass as is the face, with clear wings. All the color is done with glass line paint and a real gold pen that is fired onto the glass. Some of the angels I drilled holes into for hanging and other I wire wrapped.

Saturday, December 10, 2016

Santa fused glass ornaments


The Santa ornament above was hand painted with Glass Line Paints on a single layer of red
opal glass. It was fired at 1425 for 15 min hold time. I'm not sure why the white crackled but in this case I like it. It gives it more character. I wire wrapped these to create the loop. Each one ends up with its own expression and individuality.

I also did three with frit and scrap bits of glass and just painted a simple face. These were also fused at 1425 to a nice contour fuse. I need to perfect the faces on these. A couple were round buttons of already fused glass and one was a rough cut piece. I'm thinking next time I cut the face from white straight across on top and bottom and on the sides cut to the angle of the triangle. I guess that would be a trapezoid. Up to now all these ornaments have been experimental. Just one step in the perfecting and design process.


Thursday, December 8, 2016

Christmas Ornaments

Worked on some Tree ornaments this week. I hadn't cleaned my work table up from the last couple projects so I decided to use up some scraps that were laying around. Started with some green tinted transparent glass. Cut some triangles and decorated abstractly with scrap glass. I full fused them and drilled holes in them with a diamond Dremel tip. I was so amazed at how easy it was to drill through glass.


I tied 1/8 inch red ribbon through the holes and hung them on a display rack.

The next night I decided I wanted to do some more but used a contour fusing schedule in order to leave some texture. I made these a little larger and only used one base layer of white Opal glass then I added various frits, scraps and powders as the embellishing layer. They fired pretty well at 1370 for 10 minutes and then to 900 for 30 minutes. Next time I will try 1400 to get a little more rounding. I am using the Bonnie Glo Fiber Kiln.

I did not drill these. Instead I did a wire wrap technique to create a hanging system. To see a video I made on this technique go to

Friday, December 2, 2016

Experiment in Glass


The 6" piece of glass above was an experiment. I have a square bowl mold that when slumped the sides end up curving downward. I thought if I put a circle piece of glass into the square mold maybe the sides would slump downward into a straighter edge. A you can see in the slumped piece, that did not work. The edge stayed rounded. Which is acceptable for a different style of bowl edge and I do still like it.

Now for a mystery. I used clear glass circle for the base. I made clear frit from the scrap glass. I used other scrap glass for the design elements. I placed the clear frit around the other scrap pieces to fill in areas. Some of the yellow pieces were irid glass. The other was opal brown and white glass. After a full fuse the clear frit turned into dark bubbles. Why did that happen? The clear frit should have stayed clear and not turned into bubbles. There was no cap glass on the top to trap bubbles. The only thing I can think of was when I made my own frit in the metal Pipe frit maker some metal powder or shavings contaminated the frit. What do you think? But you wouldn't think the contamination would be evenly distributed throughout the frit. Anyway I like the effect it created.


The bowl turned out to be 4x4x1. I used the 6 inch square bowl mold below. It makes a nice sauce bowl, candle dish or jewelry bowl. It has many uses. Be creative with your molds. Think about using different shapes and sizes of glass in your molds to create unique pieces.


Thursday, December 1, 2016

Always Learning


I got these two new square bowl molds and proceeded to build my design. I cut the glass base 6x6 the same size as the mold top dimensions. I slumped the pieces and when I opened the kiln I noticed one of the bowls slumped into the mold crooked. I later read an except from a great book called "Joy of Fusing" that said to always make your pattern from your mold 1/2 inch smaller then the mold so your glass sits inside the mold and not on the top edge. Having had only one basic fusing class and basically learning from experience I did not learn this fact. I've just been lucky that most of my previous pieces have been relatively shallow and I've had no problems until now. The bowls are still pretty and usable but not 100% perfect. I highly recommend the book I mentioned by Randy and Carole Wardell. It comes as a paperback or Ebook, which I got.

Saturday, October 29, 2016

Older Painting Finally Finished

"The Blue Cabin"…16x20 Acrylic on Gesso Board

The painting above is finally finished. I started this in our motor home last summer in Montana. It sat around in my studio at home and I had lots of time to view it and decide to make changes to improve the composition. I will show you the original scene and the initial painting below. See if you can figure out the changes in the first painting and the finished one and figure out why I made the changes.

Original Photo
Initial Block In Painting

Hope you can see how a mundane photo can be a starting point for a more interesting painting. Just figure out what you liked that made you take the photo in the first place. Then figure out how to make your eye go to the center of interest and make your shapes and values interesting.

Back in the Painting Studio


I am finally back to painting. The season has changed and with fall upon us and some rainy days, my studio is nice and comfortable for painting. I chose a photo I took this summer in Canada. I cut and pasted the photo on my iPad and painted over the photo with my iPad pencil to plan out my colors and values before I began to paint. I posted the photo below without any changes.

Original Photo
iPad Rough Design.

As you can see in the finished painting below, I have made many changes to the photo above In order to create a better composition. First I moved the building over to the right side to balance better with the hills in the background. Then I changed the season to fall to create more color and interest in the vineyard. I also changed the sky to reflect a sense of weather and changed the lighting to create drama. I added some cypress trees to the foreground to add some depth and changed the foreground to a warmer color. The proportion of my painting surface was different then the photo was so my initial drawing was proportioned to fit that shape. I hope you agree that the changes made for a better painting.

Okanagan River Vineyard, Canada.....16x20 acrylic on gessoboard.

Wednesday, October 26, 2016

Layers of Art and Glass


This piece was a lesson learned. The top layer was painted with my glass powder aloe vera paints. The top layer included all the white flowers. The second layer was just a sifted layer of glass powders in yellow and green and some lavender. Both of the layers are clear glass and I fired them together at a full fuse schedule. When it was cool the I decided that the second layer was not dark enough and that next time I try this I need to double the amount of glass powder I use to get the effect I want. So to solve this problem and bring out the flowers more. I used another piece of opaque teal green glass that I painted stems and leaves on with glass line paint and sifted on more powders. I tack fused this piece before layering it with the first two already fused layers. Here is where the real lesson came in. I full fused this 3 layer piece at a conventional schedule in my Bonnie Glo Fiber Kiln, directly on the kiln washed and powdered floor of the kiln. After firing I reached in the kiln to pull out the piece and it had stuck to the kiln floor and pulled up several chunks of the floor. I thought that I was following the directions for the kiln but I came to find out that the manual was not worded correctly. Probably I should have at least used kiln paper or used a kiln shelf.  Fortunately the kiln was easily fixed by taking out four screws and flipping the bottom over. I was so relieved to find this out after I called the manufacturer. All and all I'm pretty happy how the glass piece came out though. I placed it in a stand up display and the piece has depth you can see layer to layer.

Thursday, October 20, 2016

Untitled

Glass Powder Painting

A new piece out of the kiln. I used black glass powder and sifted it all over a white piece of glass. Then I drew into the powder and subtracted the design by removing the powder and pushed it around. Next I used some of my homemade aloe vera glass powder paint to accent the design with green and yellow. I let it dry completly. Then fuse fired it on top of a clear piece of glass. Next I slumped it into a much larger platter mold, putting the glass crosswise in the center. The piece can be a free standing art piece or a dish for cheese, butter, appetizers, or a candle plate.


Tuesday, October 11, 2016

Please sign up by filling in your email above to subscribe to my blog

My Painting and Fused Glass Sketch Book

This is how I sketch my ideas for fused glass and painting. I use the "53 Paper" app as my sketchbook. It is with you always on your phone or your iPad. Because I use the Pencil with my iPad Pro it is a fantastic sketching tool in the studio or on the run. These ideas are for my next glass experiments.

The ideas are not necessarily the art but how to use a mold I already have for other shapes and sizes of glass. For instance I use a 9x12 platter mold and place a piece of glass crosswise across it to make a free standing art piece or candle shield. I also am going to try and make a snapshot photo holder by using the same mold and placing thick fiber paper between two pieces of glass to make a slot for the photo. The 53 Paper app makes it easy to handwrite notes and make diagrams. You can also bring in photos and make arrows and notes around them.


Monday, October 10, 2016

Please fill in your email above to subscribe to my blog. THanks.

More Fall Fused Glass

Finishing up the scraps of fall colored glass left over from making the platter. I used a white base glass with strips on top. This piece is all opaque. This is a cheerful colorful bowl to accompany the platter.


Saturday, October 8, 2016

Please fill in your email above to subscribe to my blog.

Fall Colors.....Fused Glass Platter

It was the right time to use my special piece of glass I've been saving. With Fall in the air these colors are perfect. I decided to make this 9x12 platter to show off the contrast between the transparent glass and the opaque glass. IM happy with the outcome.

I also made this smaller plate that can be a cheese plate, a candle plate or just a decorative piece. I hand made the glass designs with glass powder and fused it then I slumped it in the same mold as the platter above. Being that the piece was much smaller I placed it crosswise in the middle of the mold. This way I made use of my mold to make two different dishes. As you can see in the second photo it can also stand on edge for a free standing decorative piece. I will use this idea in the future to make a decorative floral or landscape.


Tuesday, September 20, 2016

Untitled

Back on the Road Again

Painting in the motor home at the dinette is not like my studio but it works. These are two paintings I have done on this trip.

The painting above is Sun Lakes Washington. It is 16x20 acrylic on gessoboard.

The painting above is "The Winery, Oliver Canada. It is 16x20 acrylic on gessoboard. Both paintings need some refinements when I get back to my studio. I worked from photos I took but made changes to fit my painting surface proportions and improved color and composition. Below are the photos I used for reference.


Tuesday, September 13, 2016

Please fill in your email above to subscribe to this blog.

Fused Glass Powder Painting

This is a 5.5x11 piece. I first did the drawing in black glass powder on a clear piece of glass. I sifted an even coat of powder all over the glass then began removing powder in the sky and moving the remaining powder around with various tools and brushes. I continued to work forward adding and subtracting powder where needed. I placed this on top of a second sheet of glass and full fused it.

Next I turned the piece over and painted with colored powders mixed with aloe vera gel. I let it dry completely over night and full fused it again. Putting the color on the backside kept the front smooth and glossy. These can be displayed on the wall, framed or unframed, or placed in a free standing table stand of metal or wood.

The photo below is after the 3rd and 4th firing. On the 3rd I painted the backside completely with aloe French vanilla paint to make the piece more opaque. I forgot that French vanilla reacts with cyan blue and it created the gray shadowing effect in the sky and the water area. I wasn't really happy with that so I put some more Opal cyan powder on the front side hoping to get rid of some of that gray. I also put a light dusting of blue over the back hills trying to set them back in distance. I probably should have put a heavier solid layer of cyan on the sky and simplified it more. I think I'll be done with this piece and take what I've learned and move on to the next.


Sunday, September 11, 2016

Please fill in email above to subscribe to my blog.

More Powder Painting Fused Glass

This piece was all free hand outlined with aloe vera glass powder paint. Then I filled it in with more paint. I placed the design on clear glass over dusty lavender glass but after firing I didn't like the color so not to give up on the piece I covered all the lavender area with more aloe paint and fired it again. It's not a masterpiece but I like it much better. I was surprised the French vanilla covered so well.
Above with lavender glass, first firing.

Second firing with French vanilla over the lavender. The surface is completely smooth shiny glass.