Friday, December 16, 2016

New Mold.....Old Project

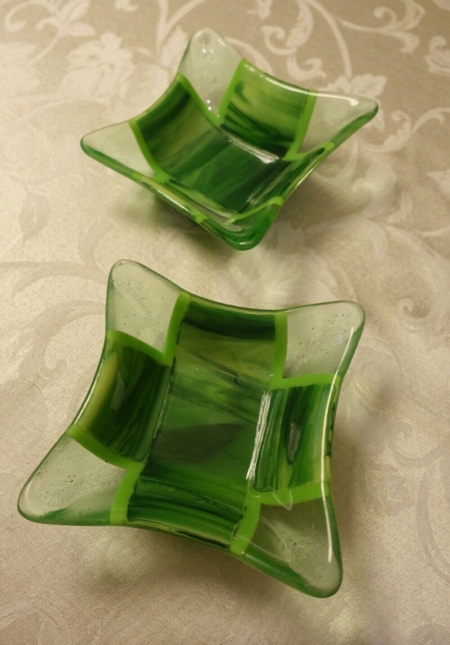
I got a new bowl mold that is deeper than any I have used in the past. I had this full fused flat piece for a while but hadn't decided what to do with it. It fit this mold perfectly. So a slumping I did go. The mold has a 1 inch flange round the top and my piece was about 1/2 inch inside that flange. It just so happened when it slumped the top edge came just to the top edge of the vertical sides. So the flange did not come into play. I like the depth of the bowl and will probably use this mold a lot. I noticed on the outside the lavender opal glass slightly got a crinkled texture around the top 1 inch. I think that was caused by the larger edge shrinking into the smaller sides of the bowl.

Christmas Colors, But Not Just For Christmas

Just out of the kiln this a.m. Pretty colorful using complementary colors. I put the design elements on a single clear layer. I didn't get too much shrinkage . The border created a slightly wavy edge. Next time I might try letting some pieces touch or hang over the edge to make a more organic edge. All my work is fired in a Bonnie Glo Kiln which is all fiber. So far I just love it. Easy to use and faster cool down.

Thursday, December 15, 2016

Angel Ornaments

This is my first angel designed ornament. It is all clear glass except for the halo which is an opal glass. The rest of the angel is hand painted with Glass Line Paints using a damp brush for the large areas. For the smaller details I use the metal tips on the paint bottles. Next time I will simplify the face, especially the mouth, with a much finer line. I fired this using a soft contour schedule which retained a little of the overlapping form.


These are my second simplified Angels. They are made using 4 pieces of glass where the above angel is seven pieces. I use the triangle as the main shapes for the body and the wings. The wings are one triangle turned upside down and placed under the body piece. I cut the tip off the top of the body section where the head butts up to it. Then the head and halo are two more separate pieces. The body pieces on these are white opal glass as is the face, with clear wings. All the color is done with glass line paint and a real gold pen that is fired onto the glass. Some of the angels I drilled holes into for hanging and other I wire wrapped.

Saturday, December 10, 2016

Santa fused glass ornaments


The Santa ornament above was hand painted with Glass Line Paints on a single layer of red
opal glass. It was fired at 1425 for 15 min hold time. I'm not sure why the white crackled but in this case I like it. It gives it more character. I wire wrapped these to create the loop. Each one ends up with its own expression and individuality.

I also did three with frit and scrap bits of glass and just painted a simple face. These were also fused at 1425 to a nice contour fuse. I need to perfect the faces on these. A couple were round buttons of already fused glass and one was a rough cut piece. I'm thinking next time I cut the face from white straight across on top and bottom and on the sides cut to the angle of the triangle. I guess that would be a trapezoid. Up to now all these ornaments have been experimental. Just one step in the perfecting and design process.


Thursday, December 8, 2016

Christmas Ornaments

Worked on some Tree ornaments this week. I hadn't cleaned my work table up from the last couple projects so I decided to use up some scraps that were laying around. Started with some green tinted transparent glass. Cut some triangles and decorated abstractly with scrap glass. I full fused them and drilled holes in them with a diamond Dremel tip. I was so amazed at how easy it was to drill through glass.


I tied 1/8 inch red ribbon through the holes and hung them on a display rack.

The next night I decided I wanted to do some more but used a contour fusing schedule in order to leave some texture. I made these a little larger and only used one base layer of white Opal glass then I added various frits, scraps and powders as the embellishing layer. They fired pretty well at 1370 for 10 minutes and then to 900 for 30 minutes. Next time I will try 1400 to get a little more rounding. I am using the Bonnie Glo Fiber Kiln.

I did not drill these. Instead I did a wire wrap technique to create a hanging system. To see a video I made on this technique go to

Friday, December 2, 2016

Experiment in Glass


The 6" piece of glass above was an experiment. I have a square bowl mold that when slumped the sides end up curving downward. I thought if I put a circle piece of glass into the square mold maybe the sides would slump downward into a straighter edge. A you can see in the slumped piece, that did not work. The edge stayed rounded. Which is acceptable for a different style of bowl edge and I do still like it.

Now for a mystery. I used clear glass circle for the base. I made clear frit from the scrap glass. I used other scrap glass for the design elements. I placed the clear frit around the other scrap pieces to fill in areas. Some of the yellow pieces were irid glass. The other was opal brown and white glass. After a full fuse the clear frit turned into dark bubbles. Why did that happen? The clear frit should have stayed clear and not turned into bubbles. There was no cap glass on the top to trap bubbles. The only thing I can think of was when I made my own frit in the metal Pipe frit maker some metal powder or shavings contaminated the frit. What do you think? But you wouldn't think the contamination would be evenly distributed throughout the frit. Anyway I like the effect it created.


The bowl turned out to be 4x4x1. I used the 6 inch square bowl mold below. It makes a nice sauce bowl, candle dish or jewelry bowl. It has many uses. Be creative with your molds. Think about using different shapes and sizes of glass in your molds to create unique pieces.


Thursday, December 1, 2016

Always Learning


I got these two new square bowl molds and proceeded to build my design. I cut the glass base 6x6 the same size as the mold top dimensions. I slumped the pieces and when I opened the kiln I noticed one of the bowls slumped into the mold crooked. I later read an except from a great book called "Joy of Fusing" that said to always make your pattern from your mold 1/2 inch smaller then the mold so your glass sits inside the mold and not on the top edge. Having had only one basic fusing class and basically learning from experience I did not learn this fact. I've just been lucky that most of my previous pieces have been relatively shallow and I've had no problems until now. The bowls are still pretty and usable but not 100% perfect. I highly recommend the book I mentioned by Randy and Carole Wardell. It comes as a paperback or Ebook, which I got.